
small kitchen renovation ideas with island can feel like a contradiction. Space is tight, traffic is constant, and every inch has to earn its keep. But here’s the thing: the right island does not “take space”—it can create storage, prep area, and better flow in one move.
Look, most small kitchens fail for predictable reasons: no landing zone, cluttered counters, and awkward walkways. A well-planned island fixes those pain points without a full gut job. Think smart dimensions, multi-use features, and lighting that makes the room feel larger.
- Use a slim island (or peninsula) to keep a clear path through the kitchen
- Build storage into the base with drawers, pull-outs, and concealed trash
- Choose a durable worktop that handles daily prep and quick meals
- Add seating strategically with a small overhang or tuck-under stools
Real-world example: a 9′ x 11′ galley kitchen swapped a bulky table for a 24-inch-deep rolling island with two stools and deep drawers. Result: 30% more usable counter space, a dedicated coffee station on one end, and a cleaner walkway because appliances and prep stayed in one zone. Small change. Big impact.
Define Your Goals, Budget, and Must-Haves for a Small Kitchen Island Renovation
Before comparing small kitchen renovation ideas with island layouts, get specific about what the island must do. A small kitchen cannot support vague goals. Decide whether the island is for prep, seating, storage, or all three, then rank those needs.
Start with constraints you cannot negotiate: clearances, door swings, and appliance access. Most small kitchens perform best when you keep 36–42 inches of walkway around the island, depending on traffic and whether appliances open into that path. If that space is not available, a narrow rolling island or peninsula may deliver the function without the bottleneck.
Set a budget range early, and tie it to scope. A cosmetic refresh (paint, new top, lighting) is different from a full island build with electrical and plumbing. Look at these must-haves first:
- Function: prep zone, seating for two, or pantry-style storage
- Utilities: outlets, task lighting, or a sink (higher cost and permits)
- Work surface: butcher block for warmth, quartz for durability, or stainless for heavy use
- Storage: deep drawers, trash pull-out, or open shelves for daily items
Example. A 10′ x 12′ kitchen with one main aisle can often fit a 24″ x 48″ island with a 12″ overhang for two stools, plus a microwave drawer on the working side. The homeowner’s goal is faster weeknight cooking, so they prioritize a durable top, two outlets for small appliances, and drawer storage, while skipping plumbing to protect the budget.
Write your “non-negotiables” on one page, then price designs against them. Now you are choosing smartly, not guessing.
Choose the Best Island Type for Small Kitchens: Fixed, Mobile, Peninsula, or Multi-Tasking
small kitchen renovation ideas with island work best when the island type matches your clearance, workflow, and storage needs. Look, the “right” island is the one that preserves safe walkways and keeps your main work triangle tight. Aim for about 36 inches of clearance around working sides; go tighter only if you accept one-cook traffic.
A fixed island suits small kitchens only when the layout is already efficient and you need permanent storage or seating. A 24-by-48-inch island with drawers on the prep side and shallow cabinets on the back can add meaningful capacity without overwhelming the room. Choose square edges and simple legs to keep sightlines open.
A mobile island (cart) is the safest bet for many compact plans because it flexes with real life. Pick locking casters, a butcher-block top, and a towel bar; roll it to the sink for prep, then park it against a wall for parties. Now, if you rent or expect future layout changes, mobile wins on cost and reversibility.
A peninsula functions like an island but anchors to existing cabinetry, which reduces clearance demands. It is ideal when you can’t maintain two full walkways around a center island. Common upgrades include a 10–12-inch overhang for two stools and outlets on the end panel for small appliances.
Multi-tasking islands combine roles—prep, seating, storage, and charging—when every inch must earn its keep. Prioritize these features:
- Shallow storage (12–15 inches) for spices, trays, and cutting boards
- Drop-leaf extension for temporary dining or baking
- Integrated trash/recycling near the prep zone
- Power for mixers, laptops, and phone charging
Real-world example: In a 9-by-10-foot galley, a homeowner replaced a bulky table with a 18-by-40-inch rolling island. It created a dedicated prep surface, added two deep drawers, and could be tucked beside the fridge to keep the main aisle clear during cooking.

Plan a Space-Smart Layout: Clearances, Work Zones, and Traffic Flow That Actually Works
Small kitchen renovation ideas with island succeed or fail on layout math. Start with clearances, because an island that “fits” on paper can still choke daily movement. Look, if doors, drawers, and people collide, the island becomes a barrier, not an upgrade.
Aim for 36 inches of clear aisle on low-traffic sides and 42 inches where two cooks work or appliances open. Need seating? Plan 24 inches of width per stool and keep the seating side out of the main path to the fridge. Tight space? A 12–15 inch overhang is usually enough for knees without turning the island into a runway.
- Cooking zone: Keep the cooktop-to-sink trip short, with landing space on both sides.
- Prep zone: Place the main prep surface between sink and fridge; add trash/recycling within one step.
- Storage zone: Put pots, pans, and utensils in the island if it serves the range.
- Traffic flow: Route entry-to-fridge movement around the island, not through the work triangle.
Real-world example: a 10′ x 12′ kitchen uses a 24″ x 60″ mobile island centered on the sink wall. Clearances are 42″ to the range side (two-cook zone) and 36″ to the pantry side (pass-through). The fridge sits at the perimeter, so kids grabbing drinks do not cut across the prep zone.
Now, test it. Tape the island footprint on the floor, then open the dishwasher, oven, and drawers. If anything hits, reduce depth, switch to a peninsula, or choose a rolling island that parks when you cook.
Maximize Storage and Function: Cabinets, Drawers, Seating, and Hidden Features in the Island
For small kitchen renovation ideas with island, the island must earn its footprint. Treat it as a storage core first, then a prep and seating surface. That mindset keeps counters clear and daily routines faster.
Start with the base: prioritize full-extension drawers over deep shelves, because you can see and reach everything. Use stacked drawer banks for utensils, spices, and prep tools, and reserve one extra-deep drawer for pots or small appliances. If you need cabinet doors, specify pull-out trays so nothing disappears in the back.
- Trash/recycling pull-out on the sink side to shorten cleanup steps
- Vertical tray divider for sheet pans and cutting boards
- Corner “dead zone” access with a shallow cabinet for wraps, bags, or baking mats
- Toe-kick drawers for rarely used items (platters, linens)
Seating must not compromise function. In tight rooms, choose a 10–12 inch overhang for perching stools, or use a waterfall end panel with a slim cantilever bracket to keep knees clear. Look, if you cannot maintain comfortable legroom, skip stools and add a narrow landing shelf instead.
Now the hidden features. Consider a pop-up outlet, an appliance garage drawer for the mixer, or a charging drawer with ventilation. Real-world example: in a 9×11-foot kitchen, a 60×24-inch island with two drawer stacks, a trash pull-out, and a 12-inch overhang replaced a bulky table—adding storage for cookware and creating a dedicated prep zone without blocking traffic.
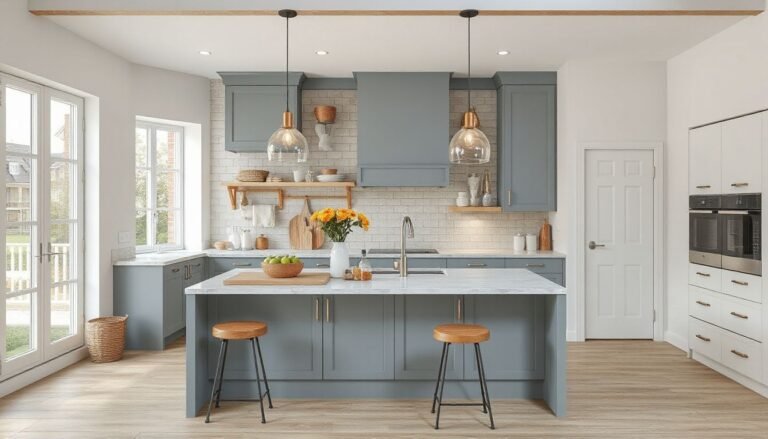
Create a High-End Look in a Small Footprint: Materials, Lighting, Color, and Visual Tricks
Small kitchen renovation ideas with island can look genuinely custom when finishes are edited and intentional. In a compact plan, fewer surfaces are visible at once, so each choice reads louder. That is good news.
Start with materials that feel substantial but behave well in tight clearances. A 20mm quartz or porcelain slab on the island delivers a “stone” look without fussy sealing, and a simple square edge keeps it modern. For cabinetry, matte lacquer or a durable painted finish hides fingerprints better than high-gloss, while a matching toe-kick creates a built-in, furniture-grade line.
Lighting is the fastest upgrade, but it must be scaled correctly. Use small pendants (or a single linear fixture) centered over the island, then layer in task lighting so counters do not fall into shadow. Look for high color quality: 2700–3000K, 90+ CRI, and dimming for evening.
- One metal, two touches: repeat the same finish on faucet and pendants; keep hardware quiet.
- Two-tone strategy: darker island, lighter perimeter cabinets to visually widen the room.
- Continuous surfaces: run the same countertop to a short backsplash for a seamless, premium look.
Color and optics matter. Light walls and uppers bounce light, while a slightly deeper island color anchors the space without shrinking it. Consider vertical tile or slab backsplash lines to “lift” the ceiling, and use under-cabinet LEDs to wash the backsplash evenly. No hotspots.
Real-world example: in a 9′ x 11′ condo kitchen, swapping a bulky chandelier for two 6″ glass pendants, adding 3000K under-cabinet strips, and painting the island deep charcoal with a white quartz top made the room feel larger and notably more expensive—without moving plumbing.
Avoid Costly Mistakes and Build with Confidence: Permits, Plumbing/Electrical, Contractors, and DIY Boundaries
Small kitchen renovation ideas with island can fail fast when permits, utilities, and scope are guessed instead of verified. Before ordering cabinets, confirm what your city requires for electrical, plumbing, and structural changes. Look, a quick call to the building department can prevent a stop-work order and weeks of delays.

Permits are most common when you move an island sink, add circuits, or change venting. If your island needs a new drain line, you may also need a vent solution, such as an approved air admittance valve where allowed. But here’s the thing, code rules vary by jurisdiction, so “it worked for my neighbor” is not a plan.
- Electrical: Plan dedicated small-appliance circuits, GFCI/AFCI protection, and island receptacle placement that meets local spacing rules.
- Plumbing: Verify drain slope, venting method, and shutoff access if the island has a sink or dishwasher.
- HVAC/venting: Confirm hood CFM, make-up air needs, and duct route before framing or drywall.
Real-world example: a homeowner adds a prep sink to a 6-foot island to improve workflow. Mid-demo, the plumber discovers the slab cannot be trenched without engineering approval, so the sink is relocated to the perimeter and the island becomes storage plus seating. The budget stays intact because the team validated constraints early.
DIY has limits. Painting, hardware swaps, and floating shelves are safe wins. Leave panel upgrades, new circuits, gas work, and load-bearing changes to licensed pros, and require lien waivers plus a written change-order process.
Frequently Asked Questions
What island size works best in a small kitchen?
Most compact layouts do well with an island that is 24–30 inches deep and sized to keep clear walkways. Aim for 36–42 inches of clearance on the working sides so doors, drawers, and appliances do not collide.
If space is tight, consider a slim prep island or a movable cart. It still gives you landing space without locking you into one footprint.
Can I add an island without moving plumbing or gas lines?
Yes. The simplest small kitchen renovation ideas with island avoid sinks and cooktops on the island, which reduces cost and permitting complexity. Keep the island focused on prep, seating, and storage.
Plan for power, though. A code-compliant outlet is often required, so coordinate early with an electrician.
What island shape is best for narrow kitchens?
In galley or corridor kitchens, a narrow rectangle or a “furniture-style” island usually performs best. Look for rounded corners if your main path cuts close to the island.
But here’s the thing: if your clearances drop below comfort, a peninsula can deliver the same benefits with less traffic friction.
How do I add storage without making the island feel bulky?
Use a mix of closed and open elements so the island reads lighter. Prioritize high-utility storage that replaces wall clutter.
- Deep drawers for pots, pans, and small appliances
- Open shelving on the non-work side for cookbooks or baskets
- A pull-out trash/recycling center to streamline prep
- End-cap storage for sheet pans or cutting boards
What is a realistic budget range for a small-kitchen island renovation?
Costs vary by cabinetry, countertop, and electrical scope. A prefabricated island can be economical, while custom millwork and stone tops raise the total quickly.
- Value approach: stock base cabinets + butcher block
- Mid-range: semi-custom cabinets + durable quartz
- Premium: custom cabinetry + waterfall stone and integrated lighting
A Practical Wrap-Up and Recommendation
A small kitchen island is worth it when it improves workflow, not just aesthetics. Look, the best results come from disciplined measurements, clear traffic lanes, and an island purpose you can articulate in one sentence.
Real-world example: in a 9′ x 11′ kitchen, a homeowner replaced a bulky table with a 24″ x 48″ rolling island, added two backless stools, and installed a single outlet on the end panel. Prep space increased, the main aisle stayed clear, and the island could shift aside during holiday cooking.
For a confident renovation decision, prioritize these essentials:
- Clearances first: protect walkways and appliance swing zones
- Right-sizing: choose depth and length that match your layout
- Function stacking: prep + storage + seating, without overbuilding
Verdict: choose a compact, utility-driven island with smart storage and simple services. Done well, it will make a small kitchen feel calmer, faster to cook in, and easier to keep tidy.