

Painting kitchen countertops is a popular way to update your kitchen. It is cheaper than buying new counters. Also, it lets you change your kitchen’s look quickly. But it is not a permanent fix. Painted countertops need care and may wear out faster. This guide will help you paint your kitchen countertops step by step. You will learn what to do and what to avoid.
Is Painting Kitchen Countertops a Good Idea?
Painting countertops is good if you want a low-cost update. It is a nice option if you plan to replace counters later. But it is not the best choice for a long time. Paint can chip, scratch, and peel. Kitchens get a lot of use. Heat, water, and cleaning can damage paint easily. So, painted counters need gentle cleaning and care.
Pros of Painting Kitchen Countertops:
- Cost-Effective: Painting costs much less than new counters.
- Quick Update: It changes the look fast.
- Temporary Solution: Good if you want a short-term change before a full remodel.
Cons of Painting Kitchen Countertops:
- Not Very Durable: Paint can wear out with heat and water.
- High Maintenance: Needs careful cleaning and sealing.
- Not Waterproof: Scratches and peeling can happen.
What You Need Before You Start
Gather these materials before you paint your countertops:
- Sandpaper (medium and fine grit)
- Cleaner (like soap and water or a degreaser)
- Strong bonding primer
- Countertop paint or kit (made for countertops)
- Paint brushes and rollers
- Epoxy or resin sealer
- Painter’s tape
- Drop cloths or old sheets
- Gloves and mask (for safety)
Step-by-Step Guide to Painting Kitchen Countertops
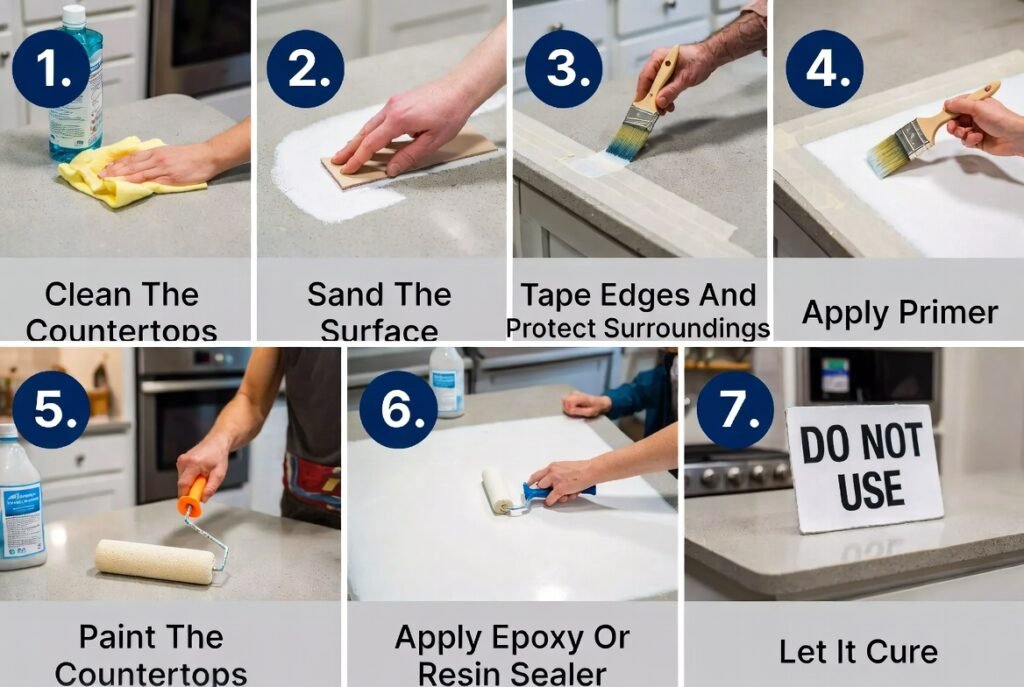
Step 1: Clean The Countertops
Clean your counters very well. Remove dirt, grease, and food spots. Use soap and water or a degreaser. Dry the surface completely.
Step 2: Sand The Surface
Use medium grit sandpaper to roughen the counter surface. This helps paint stick better. Sand all areas evenly. Then use fine grit sandpaper to smooth edges. Wipe dust away with a damp cloth.
Step 3: Tape Edges And Protect Surroundings
Use painter’s tape to cover areas you don’t want painted. Cover cabinets, walls, and sinks with drop cloths. This keeps your kitchen clean.
Step 4: Apply Primer
Use a strong bonding primer made for slick surfaces. Apply one or two coats with a brush or roller. Let each coat dry fully. Primer helps paint stick and last longer.
Step 5: Paint The Countertops
Choose paint designed for countertops or use a countertop paint kit. Apply thin, even coats. Let each coat dry before the next. Usually, 2 to 3 coats work best.
Step 6: Apply Epoxy Or Resin Sealer
Once paint is dry, apply an epoxy or resin sealer. This makes the surface hard and shiny. Sealers protect paint from scratches and water. Apply 2 or more coats. Let each coat dry as the instructions say.
Step 7: Let It Cure
Give your countertop time to cure. Avoid using it for several days. This helps the paint and sealer harden well.
Tips for Making Painted Countertops Last
- Use cutting boards to avoid cutting on paint.
- Do not place hot pans directly on the surface.
- Clean gently with mild soap and soft cloth.
- Avoid harsh cleaners or scrubbing pads.
- Touch up small chips or scratches quickly.
Example of a Painting Process Table
| Step | What to Do | Time Needed |
|---|---|---|
| Clean | Remove dirt and grease from counters | 15-30 minutes |
| Sand | Roughen surface for paint to stick | 30-45 minutes |
| Prime | Apply bonding primer | 1-2 hours (dry time) |
| Paint | Apply 2-3 thin coats of paint | 1-2 hours per coat |
| Seal | Apply epoxy or resin sealer | 1-2 hours per coat |
| Cure | Let countertop harden fully | 3-7 days |