

Installing a new kitchen sink may seem hard. But with simple steps, you can do it yourself. This guide will help you change your kitchen sink easily. No need to call a plumber. Just follow the instructions below.
Why Install a New Kitchen Sink?
Sometimes, your old sink leaks or looks old. Maybe you want a bigger sink or a new style. Installing a new sink can make your kitchen look fresh and clean. It can also help avoid water problems.
Before You Start: What You Need to Know
There are a few things to check before you buy your new sink.
- Sink Type: The easiest sink to install is a drop-in sink. It fits into a hole on your countertop. Under-mount sinks are harder and need special tools.
- Measure Carefully: Measure the hole where your old sink sits. Your new sink must fit this space well. If it does not fit, you may need to cut the countertop.
- Tools and Materials: Get a bucket, rags, utility knife, putty knife, adjustable wrench, screwdriver, safety goggles, plumber’s putty, silicone caulk, and plumber’s tape.
Step-by-Step Guide to Install a Drop-In Kitchen Sink
This is the most common and easiest type of sink to install. Follow these steps carefully.
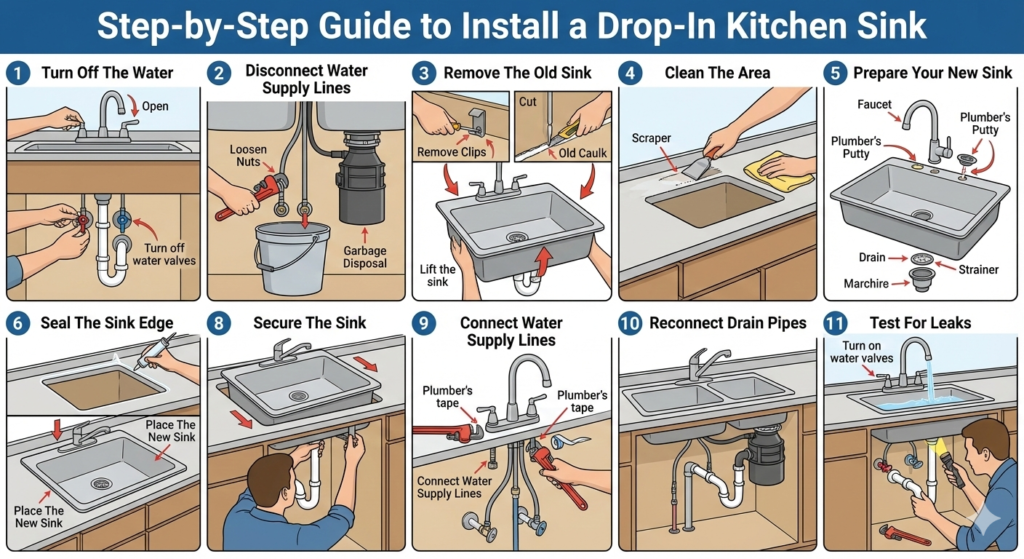
Step 1: Turn Off The Water
Find the water valves under your sink. Turn both the hot and cold water valves off. This stops water flow while you work.
Open the kitchen faucet to let out any water in the pipes. This step keeps water from spilling out when you disconnect pipes.
Step 2: Disconnect Water Supply Lines
Place a bucket under the pipes to catch any water left in the lines. Use your wrench to loosen the nuts on the water supply lines. Carefully remove these lines from the faucet.
If you have a garbage disposal, unplug it or turn off its power supply now.
Step 3: Remove The Old Sink
Look under the sink for clips that hold it in place. Use a screwdriver or wrench to remove these clips. If there is silicone or putty sealing the sink to the countertop, use a utility knife to cut it carefully.
Now, push the sink up and out of the countertop hole. If it is stuck, gently pry it loose with a putty knife.
Step 4: Clean The Area
After removing the old sink, clean the countertop surface well. Remove old putty, silicone, dirt, and debris. This step helps the new sink seal tightly and avoid leaks.
Step 5: Prepare Your New Sink
Before placing the new sink, install parts like the faucet, drain, and strainer. It is easier to do this when the sink is out of the countertop.
Follow the instructions that come with your new sink for these parts. Use plumber’s putty around the drain to stop leaks.
Step 6: Seal The Sink Edge
Apply a bead of silicone caulk around the edge of the sink hole on the countertop. This helps seal the sink and stop water from leaking under it.
Step 7: Place The New Sink
Carefully lower the new sink into the hole. Press it down firmly so it sits flat and the silicone spreads evenly.
Step 8: Secure The Sink
Attach the clips or brackets under the sink to hold it tight to the countertop. Tighten them evenly so the sink does not move.
Step 9: Connect Water Supply Lines
Attach the water supply lines to the faucet. Use plumber’s tape on the threads to help prevent leaks. Tighten the nuts with your wrench, but do not over-tighten.
Step 10: Reconnect Drain Pipes
Connect the drain pipes and garbage disposal if you have one. Make sure all pipes fit well and tighten the connections.
Step 11: Test For Leaks
Turn on the water valves slowly. Check all connections for water leaks. Look under the sink carefully for drips.
If you see leaks, tighten the connections or add plumber’s tape as needed.
Helpful Tips for Installing Your Kitchen Sink
- Work Slowly: Take your time. Rushing can cause mistakes.
- Use Safety Gear: Wear goggles to protect your eyes from debris.
- Ask for Help: A helper can hold the sink while you secure it.
- Keep Tools Handy: Have all tools close by before starting.
- Clean Up: Wipe excess silicone and plumber’s putty after finishing.
Common Problems and How to Fix Them
| Problem | Cause | How to Fix |
|---|---|---|
| Water leaks under sink | Loose connections or missing sealant | Tighten pipes and apply plumber’s tape or silicone |
| Sink moves or rocks | Clips not tight or missing | Tighten or add sink clips evenly |
| Water supply lines do not fit | Wrong size or damaged threads | Use correct fittings or replace lines |
| Drain leaks | Poor seal with putty or wrong assembly | Remove drain, add putty, and tighten again |
Final Thoughts
Installing a new kitchen sink is a task you can do yourself. Just be patient and careful. With the right tools and steps, your kitchen will look new and work well.
Remember, a drop-in sink is easiest for beginners. Measure well and prepare all parts before starting. If you find plumbing too hard, call a professional for help.
Frequently Asked Questions
Can I Install A New Kitchen Sink Myself?
Yes, you can install a new kitchen sink yourself with basic DIY skills and tools. Drop-in sinks are easiest to replace. Measure the countertop cutout to ensure a proper fit. Turn off water, disconnect plumbing, remove the old sink, install the new one, seal edges, reconnect plumbing, and check for leaks.
Can You Install A New Sink In An Existing Countertop?
Yes, you can install a new sink in an existing countertop if the new sink matches the current cutout size. Measure carefully to avoid cutting the countertop. Drop-in sinks are easier for DIY installation, while under-mount sinks may require professional help due to complexity.
Do You Need A Plumber To Replace A Kitchen Sink?
A plumber is not always necessary to replace a kitchen sink. Basic DIY skills and tools can handle simple drop-in sink replacements. Complex plumbing or under-mount sinks may require professional help to ensure proper installation and avoid leaks.
What Holds An Undermount Sink In Place?
Undermount sinks stay in place using mounting clips and strong silicone sealant. Clips secure the sink to the countertop from underneath. Silicone sealant creates a watertight bond between sink and countertop edges. Together, these components ensure a stable, leak-free installation.